Showing posts with label Tutorial. Show all posts

Wednesday, November 27, 2013

German Shepherd - Boreas


German Shepherd

German Shepherd Dog

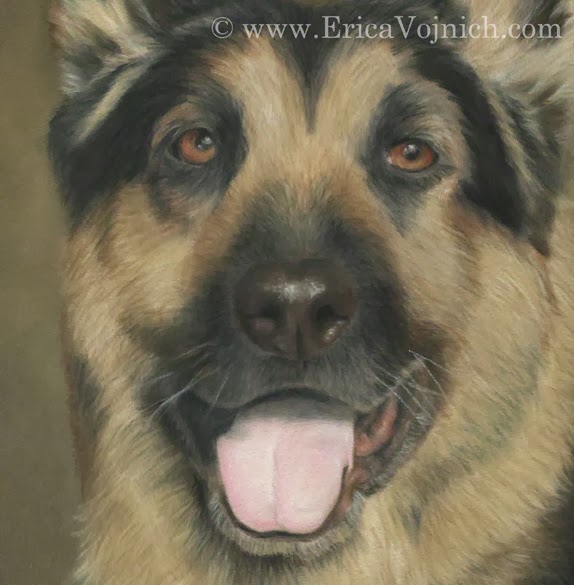
I finished up a commissioned pastel portrait of Boreas. He was a beautiful German Shepherd own by a very talented dog trainer. Thanksgiving was the anniversary of when he was brought home as a puppy and Lori wanted to have the portrait arrive to honor the time they shared together. Portraits like this are important to me as well. As a pet owner, I know how hard it is to say goodbye and it's an honor to give owners another way to keep the relationship close to their heart.

This portrait was created on Hannemuhle Velour paper, primarily using PanPastels to create texture and detail in the fur.


To learn more about Lori's work with dog training, please visit her website: http://puppy-wuppy.com/

Monday, April 26, 2010

Mr. Fancypants' Portrait (with a tutorial)

Yes, that's his name and I love it! He's called "Pants" for short. This commissioned piece is being given as a gift. I love top secret portraits It's so much fun to have everything be a surprise!


I figured this would be a nice entry to talk about the materials I use and some of my techniques.

Mr. Fancypants' portrait was created on Hannemuhle Velour paper. It's a wonderful archival and acid free paper. There are some issues with using velour paper, but I have some tips. With velour paper, erasing is out of the question. It's best to layout the drawing with a light layer of pastels and continue building the drawing. It's also possible to draw a sketch and then transfer the drawing onto the velour with carbon paper. Paint pigments also like to "dust off" velour paper. I don't like using fixative with my pastel pieces. I know this is a big debate among artists, but I'm not a big fan of fixative for pastels. To get around using fixative I use a brand of pastels called PanPastels for very large areas. This brand binds to paper very well, I highly recommend it.

Here are some progression photos of Mr. Fancypants' portrait. This tutorial is mostly going to show how I create detail in fur. Later, I will have a tutorial on eyes since it's such an important part of any portrait. I took these photos while my work was on the drafting table.

(Please click photos for a larger view.) At this stage, I've blocked the major areas with the PanPastels. I'm preparing to go into the areas where I know that fine detail will be important. I know the frame will be black and white, so I'm keeping those colors in mind while I'm working. The velour paper allows me to layer colors together. I know I want the background to have brown, grey and black shaded together.

At this stage I went back in with more brown colors in the background with the PanPastels. Then I started to go into the fine detail areas with Derwent pastel pencils. It's important to have sharp points on the pencils during this process. I like to use sandpaper to keep them sharp. I never use a pencil sharpener because the pencils are very fragile. It's important to pay attention to the direction of the fur while adding in the fine detail. I used Burnt Umber 54F, Brown Ochre 57 B, Sepia 53 F, Sepia 53 D, French Grey 70 D and French Grey 70H.

At this point, I know the final stages are near. I added in the color into the cheeks for the whiskers. I built up the background some more. I blended in some of the detail with a paper stump. I built up some of the color in the chest. In the final stages, I add shading in the inner ear, along with fur. Then I add in the whiskers with Chinese White 72 B and Ivory Black 67 B pastel pencils.

Hope this all was informative! This was my very first tutorial! Please feel free to leave comments or questions!