Saturday, December 10, 2011
Nina's Miniature Portrait / Christmas Ornament
I just loved drawing Nina, an adorable Shih Tzu!
Nina's owner wanted me to pick the colors for her ornament. It's always a special treat to get the green light to make color combos. I just wanted to go with a lavender, grey, white, and silver theme. I wanted to have more of a sophisticated look for Nina and I'm really happy with how it came out!
I know she's really going to stand out on the Christmas tree!
I'm still taking more custom orders, don't worry I sleep after Christmas! I just love this time of year too much and I work well into the deadlines to mail things out. I also have gift certificates available for my custom art.
Please stop by my website www.ericavojnich.com or email me at erica@ericavojnich.com if you have any questions.
I also have items in my etsy store
www.etsy.com/shop/ArtworkByErica if you would like to purchase items through their site.
Wednesday, November 23, 2011
New Item on my Website!
I'm very excited to announce a new item that's for sale on my website. It's a mini portrait that can also be used as a holiday ornament. It can be displayed year-round by tucking the strings inside the canvas and setting it on a miniature easel.
At first, it was a little nerve wracking putting together this type of item because I've never tried painting or drawing in miniature before. I like my art to look a certain way and I wanted to make sure something that has my name on it is something I'm proud of. So after putting together a few, I realized it was a lot of fun and many of the same principles that I use with creating my larger pieces went into creating a miniature piece.
When I draw with colored pencil, I use heat to push the wax to bloom through the paper. In a way, I'm painting with the wax rather than drawing with it. It's very handy when I'm covering larger spaces, but I found out that it's also very helpful with covering small spaces.
On a sentimental note, I wanted to talk about why this product is important to me. When I was 8, a babysitter gave my family a Christmas ornament that she painted of my family's home. It's still one of the most precious things about the holidays that I love so much. Even 20+ years later the special value that the ornament has with my family still resonates in our hearts. Unfortunately my brother called "dibs" on the ornament and I will respect it because I know I have items from my family that he wanted. It actually makes me happier knowing it was just as special to him as it has always been to me.
My hope is to be able to provide that type of ornament for someone else. I love being able to provide custom gifts for people to give at the holidays and special occasions. Over the years of creating custom art, it has been a privilege to have a small part in someone's special event.
I have had people tell me that I price my work too low, but I've always felt that art should be affordable to everyone. I don't need much to live on and make me happy so I hope that I set prices that reflects to create the art and what I think could be affordable to the general public. So this is why the mini portraits/ornaments are priced at $20. I hate thinking the economy has left some people feeling like they couldn't give a unique gift for a special occasion. I'm hoping that pricing the miniature portraits at this price and inspire people to see that love comes deep in the heart. So, it's not that I value the miniature portraits less than my other work and that's why I'm setting them at a lower price. I value my all work very much and I'm very excited that something I'm proud to produce will be more accessible.
I'm so grateful that what I love to do is appreciated. I'm thankful that my work has made me happy along with those that have seen it. Thank you so much for being supportive of my work!
The miniature portraits come shipped with a decorative white box that's perfect for storage. The miniature easels do not come with the portrait, but can be added for $2 each.
Monday, August 29, 2011
New Contest!
I'm so excited about this! Daily Kibble is having a contest to a custom pastel portrait by me! I've been reading Daily Kibble for a very long time now! It's usually how I start my day and I love reading about all the new products for my baby girls!
Please make sure you enter the contest! I can't wait to see who wins the contest!
http://www.dailykibble.com/promo/20110829_Portrait/
Wednesday, August 3, 2011
Colored Pencils Tips and Charts!
Hey everyone, I thought I would come on here and talk about some colored pencil tips that I have. It's hard to pick favorites in the mediums that I use, but colored pencils certainly rank high on my list. They're very versatile to work with and I've created some pieces that have turned out very successful. In this post, I will show some of the techniques I used to create my portrait of Luigi.
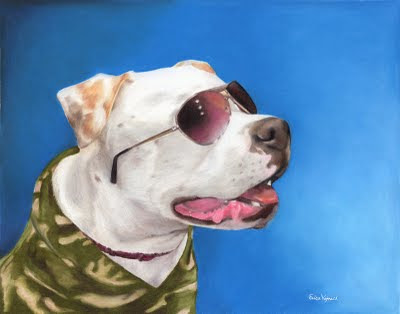
So here it goes! First things first, get to know your colored pencil set. Currently, my main colored pencils set is Prismacolored Pencils. I also have Verithin Prismacolored Pencils to cover small spaces and a Prismacolored Art Stix set to cover large areas. So how do you get to know your prismacolor set? You simply use them all. Many artists make the mistake of assuming the pencils will produce the exact color that are marked on the pencils or on the pamphlet that comes with them. The pamphlet, or even the color of the wood covering pencil, is just a helpful guide. Using the pencil is the only way you will know what color it will produce. If you don't test out all your pencils, you probably will end up loosing only half of your set.
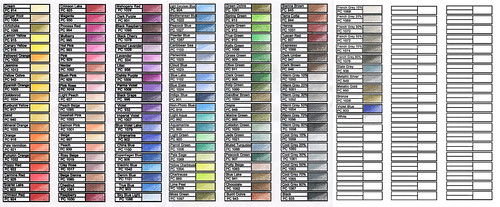
When I first purchased my set, I decided to make a chart listing all the colors. It's very helpful to have because if I see a color that I would work, I can go to the chart and see how it looks used lightly or when it's burnished. I also left room to write in pencils from other sets and additional Prismacolor pencils that might be added in the future. Notice that I have the pencil's color code on the chart as well, it's important that when you're sharpening the pencils to start on the side that's away from the color code so you can easily replace it later on.
(Click on the chart to see the photo full sized on my flickr page. If you like, you can also download this chart on Media Fire. I also have split up this chart into three pages: Page 1, Page 2, and Page 3.)
I also have this chart blank. I understand the convenience of a chart that's already filled out, however I would highly suggest that you take the time to get to know your pencils and fill out the chart yourself. Remember, colors can be interpreted differently from color monitors and printers.
(Click on the chart to see the full size photo on my flickr page. If you like you can download this on Media Fire. I also have this chart broken up into three pages as well: Page 1, Page 2, and Page 3.)
Another type of chart that I use is a Blending Chart.
This chart is helpful for finding a blended color that could work for your. On this chart, I designed it so the colors can be listed on the right. It's fun to play around with and see all the color combination that are possible. I like to apply the colors that are going across first, then the apply the vertical rows second. A blended color will be different if you lay a lighter color first to a darker color and vice versa. It's something to keep in mind while you're filling out the chart.
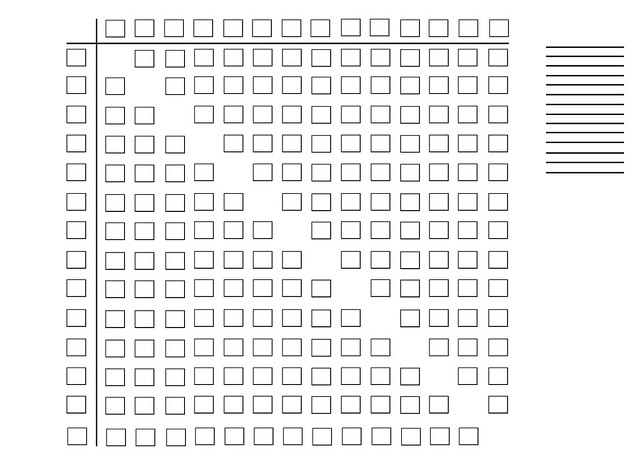
(Click on the image to see the full size on my flickr page. You can also download this chart on Media Fire.)
Here is an example of how I filled out this color chart.
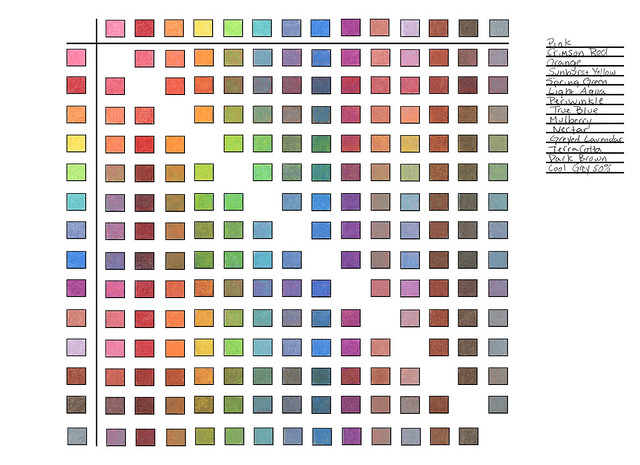
(Click on the image to see the full size on my flickr page. You can download this chart on Media Fire.)
OK, So these charts are fun and all but how to you put them to use? Well here's the next tip! If I'm working from a photo, like with Luigi's portrait pictured earlier, I like to adjust some things in Photoshop first. Just jumping in a putting the pencil to paper might hurt you in the long run. It's best to have a plan of action and to experiment with colors before starting the piece. It's helpful to take the reference photo and pixelate it first to find the colors that are in the portrait. To do this go to photoshop, select fliter, pixelate, and then mosaic.
I like to take strips of the paper that I plan to work on and create color swatches with blended colors. Then I place them next to the mosaic reference photo.
Hope you guys enjoy these tips! You can always email me at erica@ericavojnich.com if you have more questions or leave a comment bellow!
So here it goes! First things first, get to know your colored pencil set. Currently, my main colored pencils set is Prismacolored Pencils. I also have Verithin Prismacolored Pencils to cover small spaces and a Prismacolored Art Stix set to cover large areas. So how do you get to know your prismacolor set? You simply use them all. Many artists make the mistake of assuming the pencils will produce the exact color that are marked on the pencils or on the pamphlet that comes with them. The pamphlet, or even the color of the wood covering pencil, is just a helpful guide. Using the pencil is the only way you will know what color it will produce. If you don't test out all your pencils, you probably will end up loosing only half of your set.
When I first purchased my set, I decided to make a chart listing all the colors. It's very helpful to have because if I see a color that I would work, I can go to the chart and see how it looks used lightly or when it's burnished. I also left room to write in pencils from other sets and additional Prismacolor pencils that might be added in the future. Notice that I have the pencil's color code on the chart as well, it's important that when you're sharpening the pencils to start on the side that's away from the color code so you can easily replace it later on.
(Click on the chart to see the photo full sized on my flickr page. If you like, you can also download this chart on Media Fire. I also have split up this chart into three pages: Page 1, Page 2, and Page 3.)
I also have this chart blank. I understand the convenience of a chart that's already filled out, however I would highly suggest that you take the time to get to know your pencils and fill out the chart yourself. Remember, colors can be interpreted differently from color monitors and printers.
(Click on the chart to see the full size photo on my flickr page. If you like you can download this on Media Fire. I also have this chart broken up into three pages as well: Page 1, Page 2, and Page 3.)
Another type of chart that I use is a Blending Chart.
This chart is helpful for finding a blended color that could work for your. On this chart, I designed it so the colors can be listed on the right. It's fun to play around with and see all the color combination that are possible. I like to apply the colors that are going across first, then the apply the vertical rows second. A blended color will be different if you lay a lighter color first to a darker color and vice versa. It's something to keep in mind while you're filling out the chart.
(Click on the image to see the full size on my flickr page. You can also download this chart on Media Fire.)
Here is an example of how I filled out this color chart.
(Click on the image to see the full size on my flickr page. You can download this chart on Media Fire.)
OK, So these charts are fun and all but how to you put them to use? Well here's the next tip! If I'm working from a photo, like with Luigi's portrait pictured earlier, I like to adjust some things in Photoshop first. Just jumping in a putting the pencil to paper might hurt you in the long run. It's best to have a plan of action and to experiment with colors before starting the piece. It's helpful to take the reference photo and pixelate it first to find the colors that are in the portrait. To do this go to photoshop, select fliter, pixelate, and then mosaic.
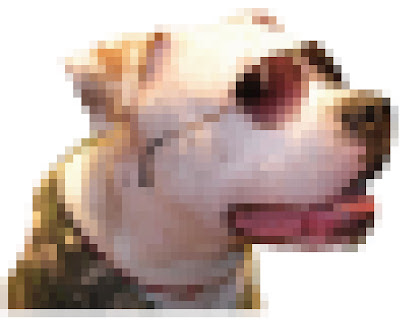
I like to take strips of the paper that I plan to work on and create color swatches with blended colors. Then I place them next to the mosaic reference photo.
Hope you guys enjoy these tips! You can always email me at erica@ericavojnich.com if you have more questions or leave a comment bellow!
Sunday, July 31, 2011
Thursday, July 28, 2011
I made some QR codes!
I'm still here! I know, it's been a while again.
Things have been busy, but hopefully I'm going to be blogging a bit more! (I sure hope I didn't jinx myself, this year has been hard enough!)
Anyway, I came on here to write about the QR codes that I made up. Some of you right now are probably wondering, "What the heck is a QR code?" Well, basically it's a funky bar code that someone can scan with a smart phone and it will link them onto a website or it will give some additional information on the product.
For example, say you're walking around Times Square and you see a QR code on a billboard. You can use an app on your smart phone and get information on the product. A lot of companies are now putting the QR codes on their business cards or in magazines. This way the person can just scan the card and go straight to the website. Some QR codes can even enter contact info into your phone when you scan them. Most the apps that I've seen, ask you if you want to be connected to the website before you're connected to it.
So what do they look like? They look usually like this:
After doing some research on QR codes, I decided to use my computer skills and I made my code (the one above) look like this:
I also made this one using the same code:
So how do you make the code? I used this website to make mine http://qrcode.kaywa.com/ and it was very easy. You just right click save and you post it or alter it in photoshop.
So which apps do you use? I have an iphone and used the apps RedLaser and i-nigma to look at QR codes and to test mine out.
Do you need to do anything else with the codes? Nope just treat it as a picture file and that's it. I like to tell people which apps to use so they can look at them. When you find them in public (they are popping up all over the place now, they're going in popularity a lot now) it's like finding a prize on a treasure hunt!
Friday, March 18, 2011
My "Mug Shots" entry for Canine Art Guild
The theme was "Mug Shots", it seems simple enough, but it left me stumped. What makes you remember a dogs face? I was considering drawing my own dogs, they certainly are my muses. Especially since they're always around when I'm working. If I'm having a hard time drawing a particular feature on a dog, they also work well as live models. However, I know I need to branch out and draw more breeds. So, I started thinking of breeds that lasting memories when I see them in public.
I started thinking about the two Pekingese dogs that must live somewhere near my house. I usually see them when I'm driving in my car and I must look silly when I slow down to pass them. They're little feet are barely visible under all the fur, they almost look like they're defying gravity as they move over the sidewalk. You can barely see their faces as well, the only thing really visible feature from my car is their little pink tongues hanging in the air. Simply put, seeing them always makes me smile and makes me happy to see my dogs when I come home.
So here is my entry, "This Is My Happy Face". I just loved this little guys expression. 11"x14" Pastel on Ampersand Pastelbord
Wednesday, March 16, 2011
Slick's Portrait
I decided to write a post as a follow up to my Valentine's Day Contest. It was a very hard choice!There were many moving stories, I actually lost sleep on who I should pick to be the winner. I decided to make Slick the winner because he inspired his owner to rescue more dogs and to become a dog handler. My dogs, Lorna and Stella, have always inspired me to help other animals, so I really was moved by Slick's story. Here is Slick's portrait 11"x14" Pastel on Velour.
Monday, January 17, 2011
Valentine's Day Contest!
Hi everyone,
I have a very special announcement to make for my website! I am going to be having a special contest in honor of one of my favorite holidays, Valentine's Day!
I've always had a soft spot for the holiday, so I wanted to share my appreciation for the day!
All that's needed to enter is to "like" my facebook page and write me a message on why your pet is the perfect Valentine! The winner will be picked by me and receive a custom portrait! The deadline to enter is Friday February 11th.
This contest is being sponsored by my friends at Leashes and Lovers and the winner will also receive a copy of Sheryl Matthys' book "Leashes and Lovers What Your Dog Can Teach You About Love Life and Happiness"
Tuesday, January 4, 2011
Did I say I had 4 pets....
As I was posting the last entry in my blog, my dog Stella was altering me to an animal in our backyard. This is typical for Stella. A lot of times it's not even an animal, it's leaf that floated by the window. However, this time, she was right on the money.
So, I logged off and went to go see what had her barking with such enthusiasm. It turned out to be a kitten! So my heart broke into a little pieces and I couldn't just sit and watch. I grabbed my coat and went out into the cold outdoors. The kitten responded to me and started to chirp. It was trying it's best to come up to me, but I could tell it was scared. So, I did what any animal lover would do and I made sure it was inside. So, I got out the havaheart trap and tuna fish.
So of course I fell in love with the kitten. This kitten is super sweet. Right now he's being kept separate from our other pets. I'm really happy that we are fostering him! He's such a sweet kitten and I'm really happy that we saved him. He's very underweight, so I don't thin he would have lived long outside. I let the dogs see him and so far they are getting along very well. We named him Logan. We're keeping our fingers crosses that he doesn't have FIV or Feline Leukemia, since that would make it hard to find him a home if we don't end up keeping him. Our vet wants to wait until the kitten is 6 months old to be sure the test results won't give false results. Our vet thinks he's around 2 months old. So I guess now we have 4 pets and 1 foster kitten! Our other pets are Simon a big red kitty, Lorna and Stella both tri color King Charles Cavalier Spaniels, and Sophie a standard grey chinchilla.
He's so sweet and affectionate. Take a look at the pictures I took of him. He even got in the Christmas spirit.
Subscribe to:
Posts (Atom)